Now the biggest task was to lay the wires and tuck them neatly inside the hood liners and the door rubber beadings.
BHPian aNANOnymous recently shared this with other enthusiasts:
Hello Jimny owners,
Another Saturday another fun activity.
This morning; me and my chota ustaad installed the most important upgrade in our Jimny. The 70 Mai A510 dash cam.
I was sitting on the fence for a while to purchase a VFM dash camera. Patiently waiting for the right online sale. Last week during Amazon freedom sale I grabbed the cam at a good price along with a 128GB Samsung memory card. Wrapped up everything within 12.5K.
I had already equipped myself with ample knowledge on the installation part from YouTube. So, it wasn’t a big deal to start right off by powering on the camera for the first time and downloading the dedicated app.
The camera connected with my phone seamlessly and all the basic settings were done in no time.
Now the biggest task was to lay the wires and tuck them neatly inside the hood liners and the door rubber beadings. I was done with that within 20 minutes. Installation of the front camera is a simple job. But the rear camera takes a lot of effort on a car with a rear door like the Jimny. The challenge here was to manage the cable in the best possible way. I cannot stand dangling cables at all.
Most of the YouTube videos had the rear camera wire somehow put on with some loose cable left hanging so that the rear door can be opened.
I was not going to settle for that. It had to be perfect and of course DIY at home.
So after taking the measurement, I routed the rear camera wire through the A,B and C pillars carefully and brought the maximum portion of the wire to the boot area. I could have just used some double sided tape and pasted the wire on the rear door keeping enough slack for unobstructed movement. But that wouldn’t be fitting for a BHPian. Perfection is mandatory.
So off came the plastic panels on the boot wall. With much effort I guided the wire through the rubber tube that connects the car body with the rear door. All the electrical connections to the rear door pass through this rubber tube.
While putting in the wire, I had the feeling similar of losing the pajama drawstring in the waistband. I believe we all had such experience once in life. The struggle was unreal.
I also had to open the rear door plastic panel with utmost care to pull the wire in. The plastic tabs which hold the panel are notoriously brittle. It took 20 minutes to open the panel itself.
The plan was to route the wire through the tube into the rear door and then bring it out through the hole made for the defogger wire.
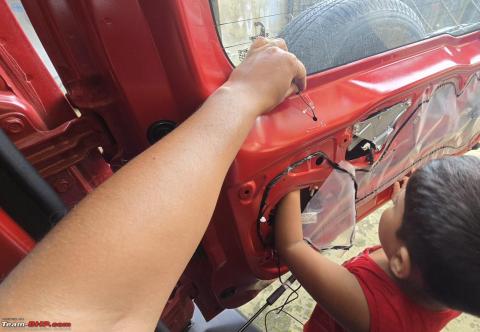
But the hole through which the defogger wire come out, was too small to let the camera connector wire pass through. Moreover accessing the defogger wire connector base is not easy. Hence my chota ustaad was called for help. His tiny hands easily did the job for which I was struggling all along. His services come at a cost. A hefty bribe was paid earlier to have him around the car for such errands. The picture of that is attached here while my wallet weeps.
However, it was not possible to bring the wire out of that opening. Only solution was to use a drill or a file to make the hole bigger. I did not want to do that. So, plan B.
I had put on plastic defogger wire covers within days of purchasing the car. So an idea struck me that I can easily cut a small portion of the plastic cover to accommodate the wire rather than messing with metal door. Therefore, the wire was now routed through a tiny gap made in the door panel and up through the defogger wire cover.
But here too I faced an issue. The defogger wire cover is fixed using adhesive. If the wire is laid underneath, it does not fix properly. So, I took a risk and used our clothes iron to melt and make a small channel on the defogger wire cover. I wasn’t sure how that would come out but it exceeded my expectations. The near perfect channel created looks like factory made and it let the wire in perfectly. I was really proud of my own doing. I am gloating but the end result was so satisfying that it was worth all troubles.
After tucking in the wire in-between the gap of the rear windscreen and the window frame, the rear camera was stuck on the glass. I used isopropyl alcohol to clean the glass before sticking the camera. Wife being a dentist; medical grade spirit ia readily available at home.
I cut some 3M double tape in thin strips to hold the wire on the glass. No dangling cables at all.
Happy with the results of the rear camera installation, I moved to the front for the final alignment of the electrostatic sticker of the front camera. The wire of the front camera was easily managed and routed underneath the glove box and through the A pillar.
Both the cameras work perfectly and now I have a sense of satisfaction as well as safety. This installation was long due. It should have been the first car accessory that I bought but never mind. It is done now.
Do share your DIY stories. Thanks.


Check out BHPian comments for more insights and information.


